Thursday, May 27, 2010

Machete and Knives

In my country when a local goes into the woods he brings a gulok, not a knife. A gulok closely resembles a machete but is a lot thicker. It is used for clearing bushes, cutting firewood, digging, butchering animals, woodwork almost everything. So it's not surprising that the very first blade I bought when I came to settle in the USA is a machete.


Ontario 12" machete.


I use the machete for woodwork, such as splitting wood for one. I know other bushcrafters use an ax, but all my life I've been using a gulok. Maybe if I have an ax, I will use it instead.


The machete is used to chop lechon. Lechon is a roasted pig and is ever present in most Filipino celebrations.

I read a lot of articles about bushcraft and most recommends a knife for survival tool. Of course what blade you carry largely depends upon where you are going. Back home a large blade like a machete is highly recommended. But in my present environment, I agree that a knife is more appropriate. I had no choice but to look for a knife, and that wasn't easy. Too many knives to choose from but quite frankly because of budgetary constraints, I opted to the affordable Moras.


Mora 840mg Carbon Clipper 3 7/8" blade .079" thick.I have Mora Craftsman Triflex Carbon Blade Knife 780 and the Mora 510 but I like the Clipper the most. The length and width of the blade is just right for me and the handle with rubber no-slip grip is just great.


I split a small branch of wood with my knife by batoning.


For woodcarving, I use the Mora Laminated Carving Model 120 above. Very sharp 2 1/4" blade and birch handle. One knife I wanted to acquire is the red handled Mora Viking 640. But my recent check with Ragweedforge website it is out of stock and the product is discontinued. I should have not dilly-dallied and bought it several months ago.These Moras I ordered online from Bensbackwoods. Order arrives fast, highly recommended. Below are the other knives I use when my main knife cannot do the chore at hand.


SAK Hiker. I like the Hiker mainly because of the saw, good for cutting small branches when I'm woodcarving or whittling.


And last but not the least, Sheefield multi-tool. Cheap but dependable, I have been using this for more than 10 years now. Some knives are for collecting and some knives are for using. These are the knives I use around the house, and carry with me when I go hiking, biking or camping.

That's all folks!. Thanks for reading.

Tuesday, May 18, 2010

Kid's Stuff - Part II

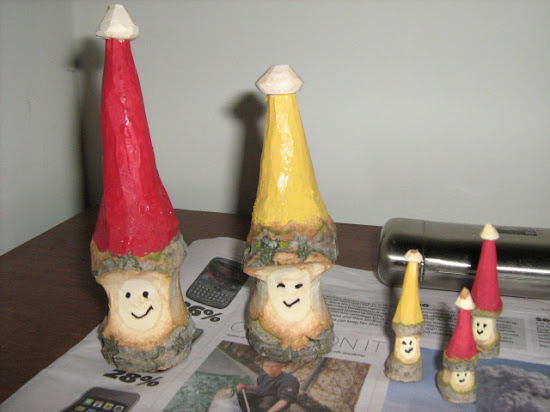
My daughter saw the spikketrollets and ask me to make bigger ones.


Luckily, I still have a bigger branch left over from rehandling my saw.


I made 2 spikketrollets, a father and a mother.


Here they are, a family.

That's all folks! Thanks for reading.

Thursday, May 13, 2010

Kid's Stuff

I got this project from www.spikk.no and its a good woodcarving practice for children. Children who want to do this must seek guidance from adults on the proper use of knives. Use protection like gloves and always be very careful.

This is all about making a spikketrollets or simply troll. I've got lots of them. I enjoy making them and I hope you will too.


Materials and Tools:
1. tree branch - must be fresh else it will not be easy to whittle and the bark might separate from the wood in the process of making the troll.
2. knife
3. sharpie - for drawing the eyes and mouth.
4. oil-based paint or watercolor
5. brush


First, make the hat. The hat is just like Santa Claus' except that it is standing and not floppy. It just like sharpening a pencil.


Then make the face. The face is flat and is made by removing the bark and a little wood. Remove also the bark at the back and at the sides of the face. Using a saw, cut the troll to the desired height.


Paint the hat with oil-based paint or water color.


Draw the eyes and mouth using a pentel pen or sharpie.


The 2 new member of my spikketrollets collection.


My other spikketrollets. Happy woodcarving everybody!

P.S.
You can hang them on your Christmas Tree.

That's all folks! Thanks for reading.

Wednesday, May 12, 2010

Wooden Spoon - Part II

When I woke up this morning I saw a tree branch lying on the ground. The previous night it was raining very hard and the branch could have broken off from the cottonwood tree in our backyard because of the strong wind. I remember I have a saw blade that needs a handle so I got the branch and cut a portion for the handle.

Since the branch was fresh, I also thought of making a spoon that I would use as a stirrer for my coffee. And tonight, while drinking coffee I made the spoon.


The materials and tools including a cup of strong coffee.


The wood is definitely softer than the one I used in my previous project.


The crooked knife for carving the face of the spoon.


After 1 hour and 30 minutes, the spoon is finished.


I am already tempted to use the spoon but it still needs sanding, and coating with olive oil to seal and protect the wood. Maybe now my coffee will even taste better.

That's all folk!. Thanks for reading.

Monday, May 10, 2010

Wooden Spoon & Fork

They say that if you enter a house and saw a wooden spoon and fork hanging on the wall in the living room, most probably the owner of the house is a Filipino.

I have visited a lot of blogs on bushcraft and most of the time I find a post about wooden spoon or wooden cup. Maybe if you're into this thing you need to make one sooner or later. So when my daughter decided to cut the small tree below, I thought its time for me to make a wooden spoon and fork.


I cut a portion of the trunk for my wooden spoon and fork.


Using my Ontario 12" machete, I split the wood in half.


Back home, I would use acacia or lanete to make a wooden spoon. I don't even know the name of this tree but when I saw it has a nice grain I thought I made a good choice.


That was a mistake though. The wood was so hard and knotted I had no choice but to use the machete all the way. I used the Mora 840mg Carbon Clipper knife only to smooth out the shape.

Carving the face of the spoon was even harder. My crooked knife could hardly cut into the wood. I ended up burning the face of the spoon with charcoal and then using the crooked knife to scrape the burnt wood. I got so frustrated that I forgot to take pictures.


Two knots on the face of the spoon made it even harder to carve with the crooked knife.


Final result, not bad. The face of the spoon is a little bit shallow, maybe I'll redo it later. The fork is easy to make, I used a saw to make the tines and whittled it with a knife.

To finish it off, I'll coat the wooden spoon and fork with linseed oil and drill holes so I can hang it in the wall. Filipino style, anyone?

That's all folks! Thanks for reading.

Saturday, May 1, 2010

Possibles Pouch

I promised in my previous post that I will be showing you my possibles pouch. So here it is:


I carry my possibles pouch, together with my PSK, when I go hiking or biking on trails, when I'm out into the woods for a day or when I go for a long drive.

I googled for the definition of a possibles pouch and this is what I got: A “Possibles Pouch” is possibly, “Whatever you want to carry in it”. I don't know if that is an accurate definition or not, but its good enough for me. Therefore, these are what I want to carry in my possibles pouch.


From left to right:
1. Bic lighter
2. Petroleum jelly coated cotton balls
3. Magnesium and flint fire starter.
4. Compass
5. Heavy-duty garbage bags, safety pins, band-aids, rubber bands and duct tape.
6. SAK Hiker
7. LED flashlight
8. String

SAK Hiker.

I chose this knife because it has a long saw that is good for cutting small branches and the price is just right for me.

With these, I've about covered everything, except for the fishing kit which I wanted to make.
Fire: Bic lighter, magnesium and flint fire starter and the ferrocerium rod in my PSK.
Shelter: 2 heavy-duty garbage bags, 2 knives.
Food: Improvised fishing kit using safety pins and string.
Navigation and signaling: 2 compass, 1 whistle, 2 flashlights
First-Aid: Band-aid, duct tape.
Repair: Safety pins, duct tape.

Of course I carry other items such as water, food and extra clothing in my pack but in this post, I am focusing only on my possibles pouch and its contents. I know through time, what I carry in my possibles pouch may change.

That is very possible!

That's all folks! Thanks for reading.